If you are having trouble trying to setup your custom domain with your blogspot blog, you have come to the right place.
If you haven't noticed this blog runs on Blogspot as well. I had so much trouble trying to setup my custom domain myself.
The guide given by Google itself here
Link: https://support.google.com/blogger/answer/1233387?visit_id=1-636146283785501872-108692412&p=customdomain&hl=en&rd=2
is good enough but is really confusing. Reason being lack of guiding images.
But fear not I am here to solve this problem for you.
If you are not in mood of learning something new today and are in hurry to just setup your domain skip the information part and follow the images to setup your domain.
Do you know how does a website work? How does it shows the content as it shows?
Here's a short version.
We take a name, a domain name and point it to a place in some server.
It is same as opening any file location in you computer. Only difference is we use a domain name instead of a proper ip of the system being accessed.
When it come to Blogspot, there are way too many blogs pointing to the same servers. Now Blogspot needs a way to filter out how these blogs point to the right files.
For this reason Blogspot uses CNAME attribute of a domain.
First of all you Domain has to point to the Google's (Blogspot's) servers. This uses A attribute of your domain name.
So all in all you need the following 4 things to setup your custom domain with Blogspot:
1. Blogspot Blog(duh...)
2. Custom Domain (A susbdomain or a domain registered at name.com, godaddy.com, bigrock.in etc)
3. Blogspot's Servers' address' which are as follows:
Now let's make this work. Step by step.
1. Go to your domain registrar(name.com, godaddy.com, namecheap.com or anything).
2. Go to you domain setting and setup you nameservers to default. (this is really necessary for the CNAME and A records to work.) If you are still confused, just do it and ask your questions later.
3. Go to manage DNS or DNS settings. (If you can't find it ask your domain registrar support to help you find it.)
4. In Manage DNS or DNS setting you will find A-records, AAAA records, CNAME etc. Our business is with A-records and CNAME only.
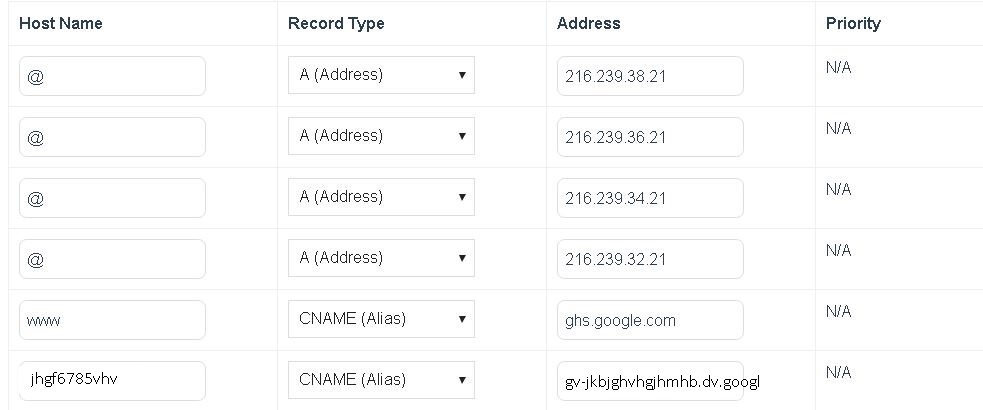
5. Fill up the A-records and CNAME records as shown in image below:

That is all. Your Domain should be up running the blogspot blog. If not, have some patience this could take upto an hour sometimes even days.
If you haven't noticed this blog runs on Blogspot as well. I had so much trouble trying to setup my custom domain myself.
The guide given by Google itself here
Link: https://support.google.com/blogger/answer/1233387?visit_id=1-636146283785501872-108692412&p=customdomain&hl=en&rd=2
is good enough but is really confusing. Reason being lack of guiding images.
But fear not I am here to solve this problem for you.
If you are not in mood of learning something new today and are in hurry to just setup your domain skip the information part and follow the images to setup your domain.
Do you know how does a website work? How does it shows the content as it shows?
Here's a short version.
We take a name, a domain name and point it to a place in some server.
It is same as opening any file location in you computer. Only difference is we use a domain name instead of a proper ip of the system being accessed.
When it come to Blogspot, there are way too many blogs pointing to the same servers. Now Blogspot needs a way to filter out how these blogs point to the right files.
For this reason Blogspot uses CNAME attribute of a domain.
First of all you Domain has to point to the Google's (Blogspot's) servers. This uses A attribute of your domain name.
So all in all you need the following 4 things to setup your custom domain with Blogspot:
1. Blogspot Blog(duh...)
2. Custom Domain (A susbdomain or a domain registered at name.com, godaddy.com, bigrock.in etc)
3. Blogspot's Servers' address' which are as follows:
- 216.239.32.21
- 216.239.34.21
- 216.239.36.21
- 216.239.38.21
Now let's make this work. Step by step.
1. Go to your domain registrar(name.com, godaddy.com, namecheap.com or anything).
2. Go to you domain setting and setup you nameservers to default. (this is really necessary for the CNAME and A records to work.) If you are still confused, just do it and ask your questions later.
3. Go to manage DNS or DNS settings. (If you can't find it ask your domain registrar support to help you find it.)
4. In Manage DNS or DNS setting you will find A-records, AAAA records, CNAME etc. Our business is with A-records and CNAME only.
5. Fill up the A-records and CNAME records as shown in image below:

That is all. Your Domain should be up running the blogspot blog. If not, have some patience this could take upto an hour sometimes even days.


No comments:
Post a Comment