Showing posts with label Softwares. Show all posts

18 January, 2020

[FIXED]Google Chrome all Black after Windows Update

If you're having an issue with your Google Chrome where everything is turned black. The following fix will solve your problem in a matter of seconds.

What does it look like?
I've added a screenshot of what happened to my Google Chrome after the update.


Follow the following steps to fix the problem.
  1. Right click on Chrome shortcut and click properties.
  2. Inside properties, under Compatibility tab choose to Run this program in compatibility mode for Windows Vista. Any variant would do. If one doesn't work try other.

    and your Google Chrome should be up and running but if you'll restart it the problem will persist. To fix it permanently we need to tweak some settings.
  3. With the Chrome running Go to Settings and under Advanced Settings

    Disable 'User hardware acceleration when available'


Relaunch Chrome and it should be working fine now.
This post was updated from Google Chrome, so I know it works. ;)

25 January, 2019

Why a one account for all Streaming Services would be a great idea

Since 2011, Netflix has become one of the most powerful companies in the world, boasting a worldwide user base of nearly 150 million. Between 2011 and 2015, Netflix and other streaming services penetrated the global market so effectively that piracy plummeted roughly 50%.


However, for the first time in years, that trend line is changing. In 2018, global piracy went up.

Global piracy rate is a useful indicator for the health of the streaming market because it highlights a key value of streaming providers: convenience. Netflix proved that even in a world where piracy is accessible and relatively low-risk, users are willing to pay for convenience. No one wants to search dodgy corners of the internet to stream The Office if they don't have to.

The migration of users from streaming services back to piracy indicates that streaming services are no longer offering the same level of convenience they used to. There are two major reasons for this.

The first is market segmentation. If you want to watch WestworldAtlanta, and The Marvelous Mrs Maisel, you'll need to subscribe to some combination of HBO, Hulu, and Amazon Prime. As major streaming services invest in exclusive content (Netflix budgeted $13 billion for original content in 2018), users are forced to sign up for multiple services or miss out. As producers like Disney launch their own exclusive streaming services, the problem only grows.

The second is international licensing. International licensing for media is a nightmare, and for streaming services, it presents a massive bottleneck. While Netflix users in the U.S. enjoy thousands of streamable movies, users in Portugal get by with a couple hundred. In countries with strict censorship laws like Saudi Arabia, numbers become even smaller.

These forces converge to make individual streaming services less convenient—and therefore less valuable—to users, making the trade-offs of piracy more worthwhile. And while that may not spell the end for streaming services, it does signal that we may be seeing the end of streaming's golden age.

There seems to be a need for One Account for all streaming services in this world. But such a program will require a lot of money to put it in action. Paying royalties to streaming services and playing it through their application (maybe). Such a thing seems only possible by a joint effort. Hopefully, someday these big players will realize and work together on something like it.

09 December, 2018

How to cast Desktop to Fire TV Stick or FireTV 4k

With the latest update to FireTV sticks, they lost the ability to work as a cast sink. 
The new FireTV sticks don't have the option for Mirroring at all.
But there's nothing to worry about and there seems to be a workaround for that.


Firstly, you'll need the CastApp to be installed on your FireTV Stick. 
You can download the CastApp from this direct download link
If the link does not work you can get it from the XDA forum thread here. Or https://forum.xda-developers.com/fire-tv/general/chrome-cast-receiver-fire-tv-t3708913

Once downloaded you need to install it in your FireTV stick. To do that either install adblink from this tutorial or transfer it to FireTV stick using ES File Explorer like most of the people do.

Once installed open the application and check Google Cast.


Now open Google Chrome web browser.
Click on the menu button on the top right and click on Cast...


After that click on down arrow Cast to.


And select Cast desktop


And then select your FireTV Stick


Sometimes you might note that it won't find your FireTV Stick in the list. To fix that just untick Google Cast in CastApp Settings and check it back. 

This application not only works for desktop but your mobile phone as well.


23 March, 2017

How to take screenshot on Windows

When working in a team often times we come across the situation where we need to share what is on our screen. A screenshot is a still picture of what is on your screen. 
Following are different ways you can take screenshot on Windows.

1. Print Screen and Ctrl + V
This method works irrespective of the Windows version you are on. So if you are on Windows XP, Windows 7 or Windows Vista this is the best possible and easiest way to take screenshot.

> Press PrtScn.
> Open Microsoft Paint or any other image editor.
> Press
Ctrl + V which stands for paste.

2. Screen Shot softwares.

Screen shot softwares have run out of business over the time there but still there are many out there. Most of them carry too much ads to be trusted. Fortunately some of them are really simple and easy to use.
One such screenshot software is LightShot.


Apart from this there is a tool that comes bundled in Windows now called Snipping Tool


It is simple and very much like LightShot only problem is that there is no way to set a shortcut key for taking screenshot. Which is why it is not as handy as LightShot.


3. Chrome Extensions like Imgur

This isn't all that necessary if you are using LightShot already and it is just limited to taking screenshot of the Chrome Window only. Only good thing about this extension is that it lets you capture whole page as an image, which is nice.


Apparently LightShot is best possible way for taking screenshot on Windows. The installer package is nice and the software is clean. There are no ads in the program although the site where the images are uploaded carry ads but that's still acceptable. Beware of the software that carry useless ads in the installer package and can ruin your computer and browser with ads and ads everywhere.


26 January, 2017

Best FREE Alternatives to Photoshop

As good as Adobe Photoshop is, not everyone can afford to own a licensed version. Most of the Photoshop version out there in use are just pirated copies. But is it really that necessary?
Unless you are running a million dollar enterprise or a graphics developer team I really don't see any good reason for having a Photoshop, especially when there are lot's of work around to any problem.

Here I will be discussing some alternative approaches and softwares that can help you out from any Photoshop need with using Photoshop.

1. GIMP
If you go on a search for a free alternative to Photoshop, this one will always be there in any list. And why not! GIMP is perfect in its own and there is a better version coming out very soon viz GIMP 3.0


Only problem GIMP has so far is it's inability to deal with high resolution. It's rather difficult to explain in words but I can give you an example of the problem. Say when you Open and image as a layer in your canvas and resize it, GIMP usually blurs the detail out of image thus rendering them next to useless. The work around to this is to resize the image outside GIMP say in Ms Paint and use the resized version.
Download: gimp.org/downloads

2. INKSCAPE

Inkscape is also a really popular vector graphics editor. Only problem is, it's a vector graphics editor. So unless you are going to vector graphics in this you will find it really difficult to work with.

3. KRITA 
Krita is a manga and anime drawing tool, but of course it's not limited to that. It's not like somebody will call SWAT on you for making a logo on Krtia. It's simple, full of feature which could take your whole day to learn everything and it's beautifully designed.
4. PIXLR.com/Editor

Now given all of the options, this has to be the best and it's an Online Editor. Pixlr has got all of the option you might need. Ofcourse it's tiresome to do hefty task on this since it's an online editor, but it's something you should have a bookmark of always.

15 January, 2017

How to stop Ongoing Windows Update

Do you find it frustrating that there is no pause or stop button right next to where the Windows show the update progress?

Follow these steps to stop the ongoing Windows download.

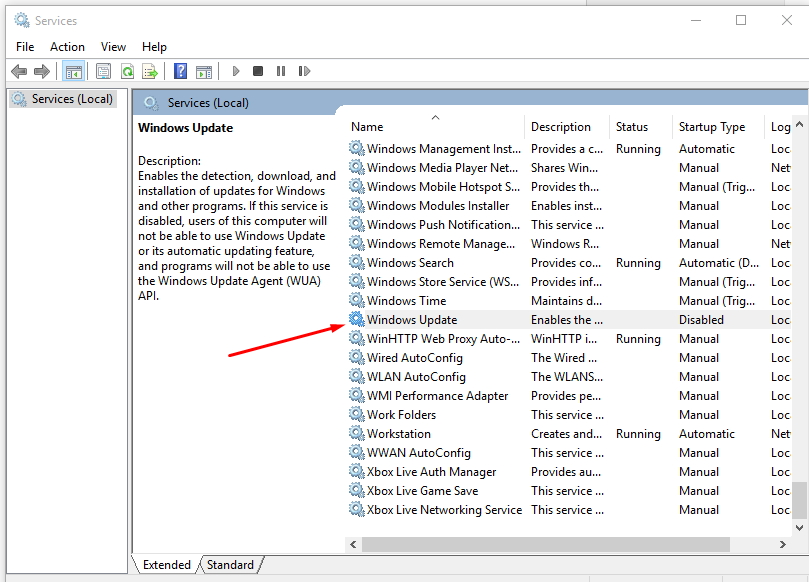
Step 1: Open Run(WINDOWS KEY + R) and type services.msc and press enter.

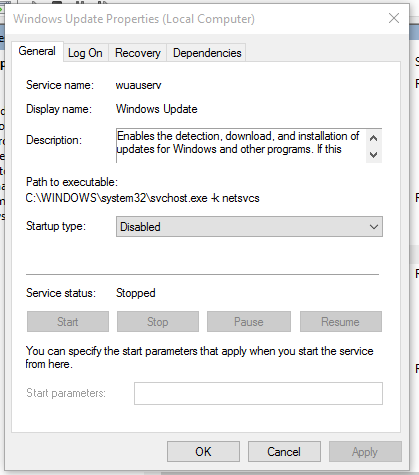
Step 2: Locate Windows Update service and double click it to open.


Step 3: From what appears next you can stop, pause  the on going Windows update and also prevent Windows from updating itself.


08 December, 2016

How to MySQL with EasyPHP

PHP and MySQL always go side by side. Now if you are going to build a PHP website that would be saving any kind of that you will need a database to store that data. MySQL is that database which will be saving your data, and to access, modify or save data in this database you need SQL which stands for Structured Query Language.

Now if you are aware of the previous post we are going to use EasyPHP for our work here as well.
Considering you have installed and configured EasyPHP from previous post. Lets get started with MySQL.

1. First of all open the EasyPHP dashboard by right(or left) clicking the EasyPHP tray icon.


2. Now click on Start under Database Server to start a database server.


3. If you find multiple option go with any I went with the first.


And click on start.

4. Once started we need to run queries. To do so we need PHPmyAdmin.
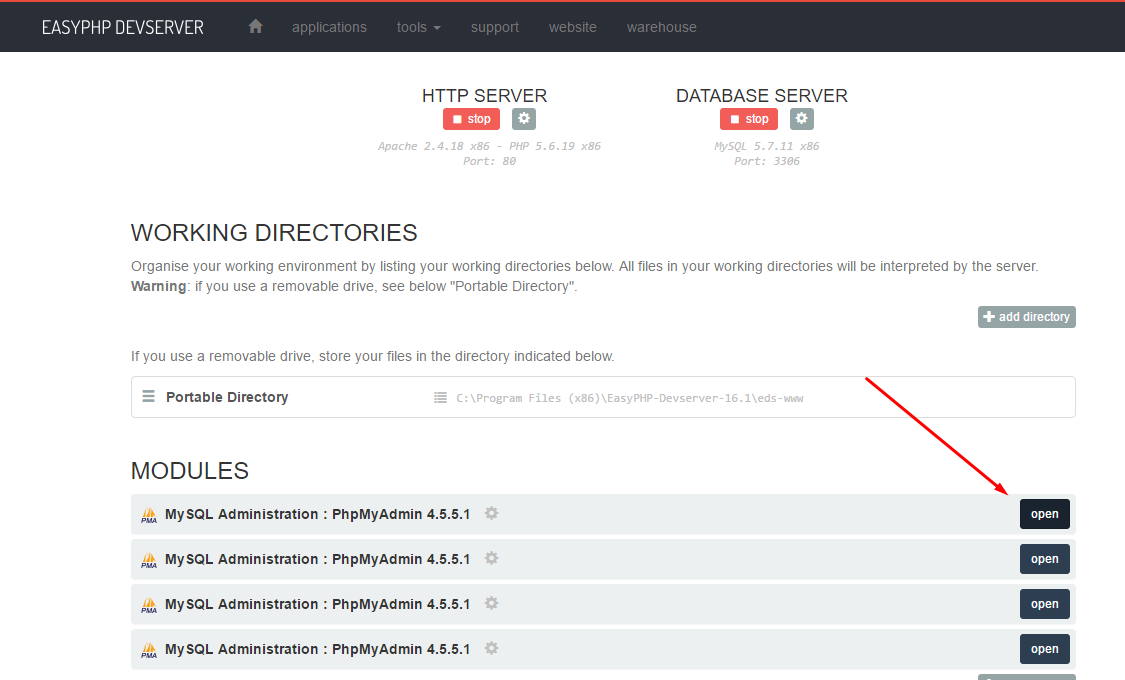
Go to the  EasyPHP dashboard again and there you will find MySQL Administration PHPmyAdmin as shown.


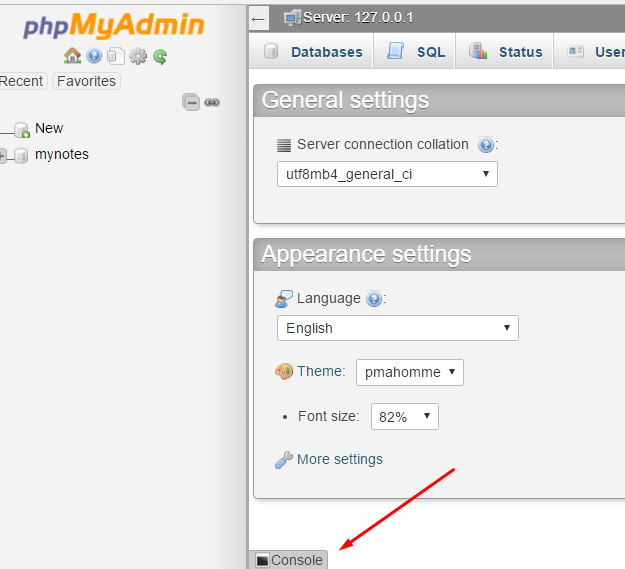
5. Upon opening you will find the PhpMyAdmin dashboard. To execute your SQL commands you have to open console which is at the bottom of the Window as shown.


6. Let's execute our first query to see what all databases are already there.

mysql> SHOW DATABASES


Upon doing that I got the list of databases I already have. Out of these "mynotes" is the database I have made previously.

That's it. Now you are good to go. Create your own database, tables and enter data into that.

Let's do some queries now.


Since all of the data is always placed in a database, we need to first create a database.
To do that query mysql

mysql> CREATE DATABASE mydb;

Here mydb is just a name and you can use any name of your choice as you like.
Now the information in a database is stored in the tables. We need to create a table for that.
But before we create a table we need to specify in MySQL that we want a table to be created in the database we just created. In order to do that we query

mysql> USE mydb;

Following SQL query will create a table.

mysql> CREATE TABLE myTable (
                          columnOne INT NOT NULL PRIMARY KEY,
                         
columnTwo TEXT,
                         
columnThree DATE
                         
);

This will create a table with three columns with the names columnOne, columnTwo and columnThree respectively.

You can use the query

mysql> DESCRIBE myTable;


to see how your table looks like.

Now there are two ways of inserting data into these tables.

1. 
mysql> INSERT INTO mytable SET 
columnTwo = "Any textual message here!",
columnThree = "2016-12-8"


2.
mysql> INSERT INTO mytable (columnTwo, columnThree) 
VALUES("Like I said any thing textual!", "2016-11-7")


You must have already noticed that I did not enter anything for columnOne, infact I did not even mentioned it in my queries. It is because I made that column NOT NULL and set it to AUTO_INCREMENT when I defined the table. 

Now to check out our table content we query

mysql> SELECT * FROM myTable

That's all. Your table is up and running your database.
If you are confused as to use the semi-colon or not, it does not matter. 

07 December, 2016

How to install and configure EasyPHP

If you are going to learn PHP programming you will need to run a server that hosts your PHP pages. For doing this there are multiple ways. All of them are nothing but server applications that run an Apache server on your system, For some reasons I find installing the Apache server itself bit confusing. But that can be worked around by using WAMP or EasyPHP.

If you are getting "msvcr100.dll missing" error see this.

1. Going with EasyPHP download the latest EasyPHP Dev Server from their official site, here. As of writing this the latest is 16.1.1

2. Go with the default installation. Which will install in the directory of your windows.

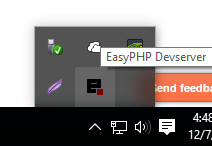
3. Once installed you will see an EasyPHP tray icon as shown.


4. Right(or left) click the tray icon and click Open Dashboard. Which will open up a page in your Web Browser as shown.


5. Once we got the all we have to do is start the service we need. Since we want make PHP pages, click start under HTTP SERVER. If there are multiple choices of the server as shown below go with anyone. I went with the first one which starts with 32 bit server. I guess the other choices would have done the same.

Now let everything in default and Start it.
6. Once started you can check whether your server is running or not by opening the local host of your computer. To open local host, just type "localhost" (without quotes) in the address bar of your web browser or just click this http://127.0.0.1/ 
If you don't see any error means everything is working fine.

7. Now this localhost is a location in your system which is present in the installation directory of EasyPHP. Go to the installation directory and find the Folder by the name "www" or "eds-www" in my case. 

Open this folder and you will find a phpinfo.php file there. Let it remain there. Now we will work with our php files in this "www" folder.

You can create as many subfolders you want. Like I created a "test" folder for the sake of testing.

8. Now create a PHP file.

I did by this code:

<?php
$testPhrase= "Hello World!";
echo $testPhrase;
?>


Copy it and save the file by the name "index.php"

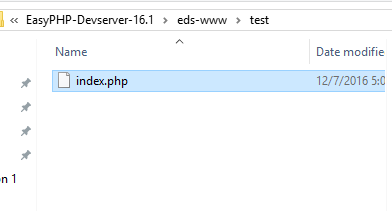
Place this file anywhere in the "www" directory of EasyPHP as shown.


I placed the index.php in the subfolder "test" I created.

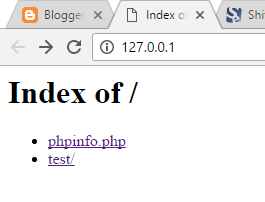
9. To test my code is working we open the localhost in the web browser and head over to the "test" directory.


Upon clicking the "test" subfolder I get my code running.


That's it.


30 November, 2016

Make free anonymous phone calls from Internet


When you make a call over the Internet it is called Voice Over Internet Protocol or VOIP call.
It is fairly cheap compared to the regular operators we use for phone calls. Although it cannot be considered reliable. But then again you can even make anonymous phone calls using these services.

EvaPhone and Call2Friends provide these services for a limited time for free that too everyday.


Link: https://ievaphone.com/

Link: https://call2friends.com/

You can even consider buying subscription of these services which is fairly cheap and has no expiration. That is pay per use.Just know that even though these calls are anonymous they are anonymous to some extent only and you identity can be traced through them.

12 November, 2016

How to play 1080p videos on low-end system

If you are having trouble playing the full hd videos this might help you up. I have an atom processor tablet with 2 gb of ram and was able to run the full hd videos without any lag or loss of frames.

Assuming you havent tried anything new you have already tried running your videos on VLC player.

Try Media Player Classic with ffdshow codecs. This significantly improves the playback of full hd videos.


Link: https://mpc-hc.org/downloads/

If the default media player classic isn't the answer for you try klite codec pack.

Link: https://www.codecguide.com/download_kl.htm

20 October, 2016

Best Screenshot Software for Windows and Mac

Even though Windows has it's screen shot taking abilities, but it becomes hectic when you are in a situation where you need to take multiple screen shots.

I recently came across with Lightshot on a system of a friend of mine at work. Lightshot is by far the best screen shot application for windows. That being said, it consists of everything you need and more.

For instance you can highlight portions in the screenshot as you take it.
Add text to the screen shot for better understanding.


You can download Lightshot from their official website here: http://app.prntscr.com/en/index.html

If you are in Software testing Lightshot comes handy and would save you a lot of time. 

Featured Post

Content Writing VS Content Marketing: How are Both Different From Each Other?

Regardless of how long the businesses have been introduced to digital marketing, it is often seen that they confuse the terms of marketing. ...